
Key Vault for aspnet core app secrets on Azure and local dev environment
Goal
The goal of the article is how to move app secrets (connection strings, passwords, access keys, etc.) to Key Vault.
What problems will be solved
- No secrets in appSettings.json
- No texting secrets between developers
- Changing secrets without app redeploy
This is especially useful for startups when you need to get things done without big investment in infrastructure, but don’t want to compromise security.
How the config will get transformed
Let’s assume that’s initial application appSettings.json
{
  "AppName": "My App",
  "ConnectionStrings": {
    "Sql": "Sql Database Connection String Including User Id and Password"
  },
  "ApiKeys": {
    "SendGrid": "Send Grid Api Key"
  }
}
In next steps, I’ll create a Key Vault and move all the secret there.
{
  "AppName": "My App",
  "KeyVault": {
    "Url": "https://my-app-key-vault.vault.azure.net/"
  }
}
Instead of removed secrets, I’ll add only a KeyVault Url to configuration, without any access keys. Furthermore, we’ll see how to make it work on different environments:
- Local (the developer machine)
- Web App (App Service) / Container App
- Azure Kubernetes Service
- Any other environment using Environment Variables
I’ll cover two methods for getting this done. The Azure CLI for those who love the command line, and the Azure Portal for a visual approach. You can pick your favorite.
While both work, I highly recommend having the Azure CLI installed for any serious Azure development. It’s a powerful tool to have in your back pocket.
Setup Key Vault
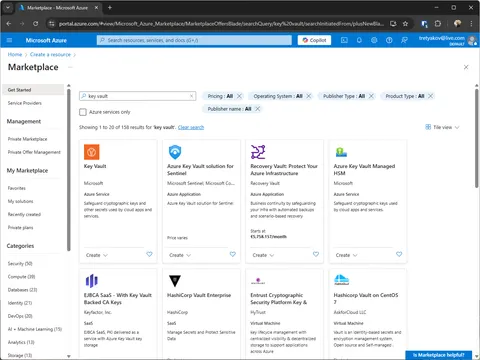
Create Key Vault
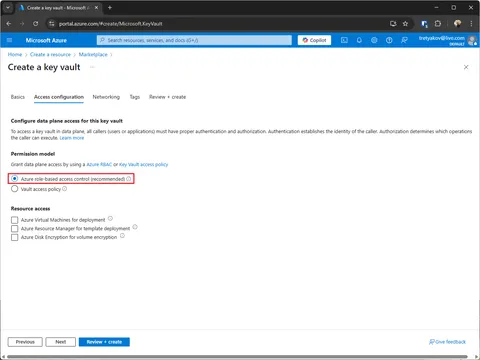
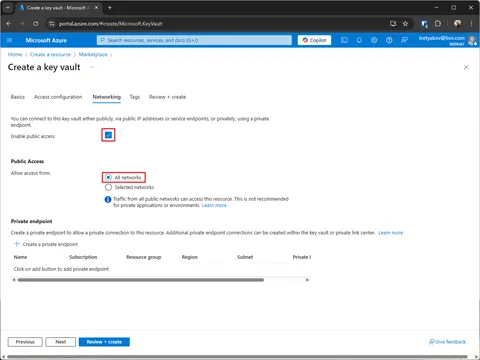
There are no specific requirements for this example, all matches the azure defaults. However, if something changed be sure that:
- Permission model is set to Azure role-based access control (RBAC)
- Public Access is enabled and is set to All networks or both cloud and your local environment has access to specified network.
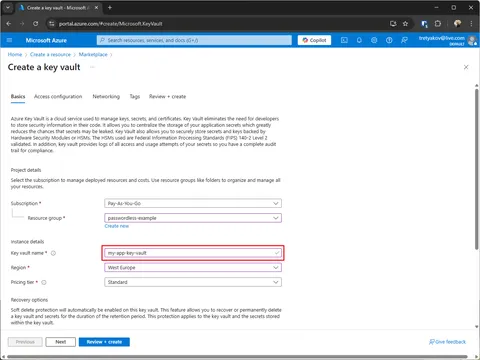
In this example, I’ll create key vault with:
| name | my-app-key-vault |
|---|---|
| resource-group | passwordless-example |
| location | westeurope |
You’ll see the Key Vault name (my-app-key-vault) pop up a lot in this example. The name must be unique, there is a chance you’ll need a different name going though the exercise.
Don’t sweat the resource group or location too much — they’re totally up to you. That said, it’s generally best to keep your Key Vault in the same region as your applications.
Once crated your Key Vault address will be https://[NAME].vault.azure.net/,
in given example https://my-app-key-vault.vault.azure.net/
Using Az CLI
az keyvault create \
  --name my-app-key-vault \
  --resource-group passwordless-example \
  --location westeurope \
  --enable-rbac-authorization true \
  --public-network-access Enabled \
  --network-acls '{"defaultAction":"Allow","bypass":"AzureServices"}'
Using Azure Portal
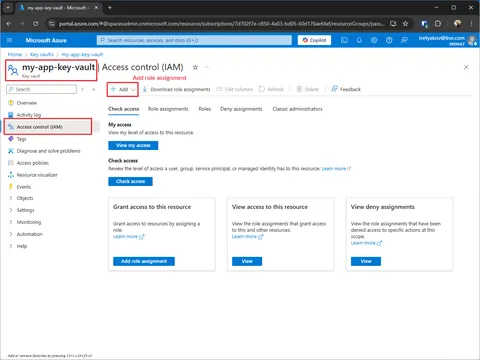
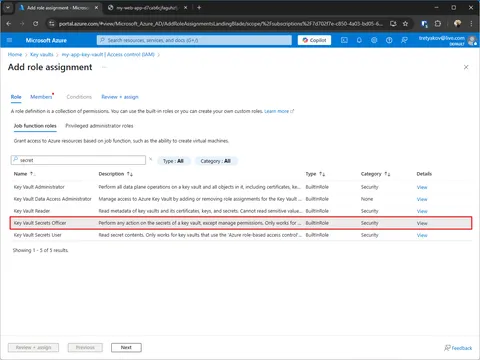
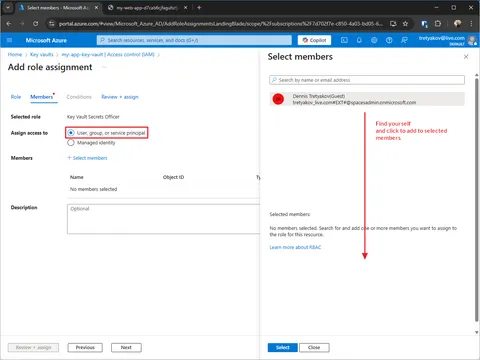
Assign yourself Key Vault Secrets Officer role
Once you create a Key Vault, you are assigned an Owner role. The owner can manager permissions, but not allowed to read/write secrets. Therefore, you need to assign a Key Vault Secrets Officer role to yourself.
Key Vault Secrets Officer role — allows to Read and Write Key Vault secrets.
Key Vault Secrets User role — allows users to Read secrets.Every developer in your team (including you) will need to have one or another role!
Using Az CLI
KEYVAULT_NAME="my-app-key-vault"
RESOURCE_GROUP="passwordless-example"
ROLE="Key Vault Secrets Officer"

USER_OBJECT_ID=$(az ad signed-in-user show --query id --output tsv)

SUBSCRIPTION_ID=$(az account show --query id --output tsv)

SCOPE="/subscriptions/$SUBSCRIPTION_ID/resourceGroups/$RESOURCE_GROUP/providers/Microsoft.KeyVault/vaults/$KEYVAULT_NAME"

echo "Assigning '$ROLE' to user $USER_OBJECT_ID on Key Vault $KEYVAULT_NAME..."
az role assignment create \
  --assignee "$USER_OBJECT_ID" \
  --role "$ROLE" \
  --scope "$SCOPE"
Using Azure Portal
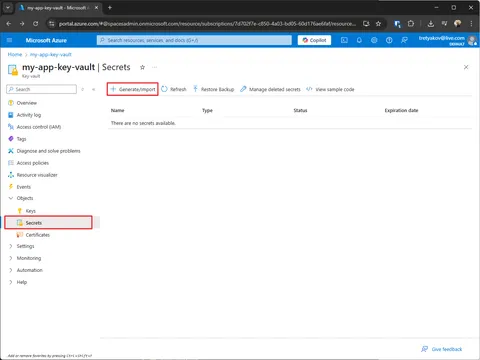
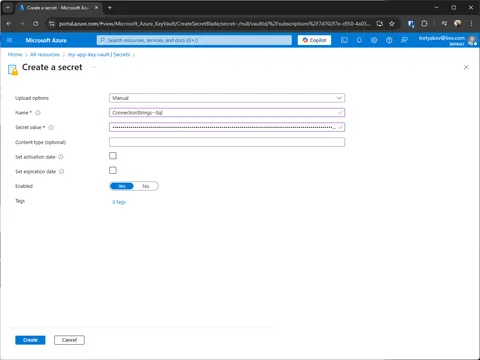
Add configuration values into Vault
In a given example, we have two configuration keys to be moved to Key Vault.
In dotnet, configuration keys are structured with colons (
:). Since Azure Key Vault doesn’t allow colons in secret names, the standard workaround is to use a double dash (--) instead.For example in dotnet configuration key
ConnectionStrings:Sqlin Key Vault would beConnectionStrings--Sql.
The example below adds ConnectionStrings--Sql to Key Vault, same way you can add ApiKeys--SendGrid.
Using Az CLI
az keyvault secret set \
  --vault-name my-app-key-vault \
  --name "ConnectionStrings--Sql" \
  --value "Sql Database Connection String Including User Id and Password"
Using Azure Portal
When playing with Key Vault, remember that deleted secrets aren’t gone immediately. Look under “Manage Deleted Secrets” to purge them completely before you can reuse the name.
Configure app and setup local (dev) environment
There are no much to code, but if something goes sideways, you can compare it to example repo.
The following example assumes your appSettings.json looks like this
{
  "AppName": "My App",
  "KeyVault": {
    "Url": "https://my-app-key-vault.vault.azure.net/"
  }
}
Connect an application
Add configuration source
// required nuget packages:
// - Azure.Extensions.AspNetCore.Configuration.Secrets
// - Azure.Identity

using Azure.Identity;

var builder = WebApplication.CreateBuilder(args);
builder.Configuration.AddAzureKeyVault(
    vaultUri: new Uri(builder.Configuration.GetValue<string>("KeyVault:Url")!),
    credential: new DefaultAzureCredential());
Just for local testing purposes, let’s add a silly route, which obviously should never see a production.
var app = builder.Build();

// a silly route for testing
app.MapGet("/", (IConfiguration cfg) => Results.Json(new
{
    AppName = cfg.GetValue<string>("AppName")
    ConnectionString = cfg.GetConnectionString("Sql"),
    SendGridApiKey = cfg.GetValue<string>("ApiKeys:SendGrid"),
}));

await app.RunAsync();
That’s it! No more changes to the app are required. No password or access keys or anything else.
The environment where the app runs must be connected to Key Vault, and that’s what we are going to go though further in the article starting with Local Environment.
Local overrides
Just one thing before going forward.
As KeyVault is added after all other (default) configuration sources, the values in Key Vault, if present, will have priority over all others. For local overrides, I prefer to use secrets configuration source.
using Azure.Identity;

var builder = WebApplication.CreateBuilder(args);
builder.Configuration.AddAzureKeyVault(
    vaultUri: new Uri(builder.Configuration.GetValue<string>("KeyVault:Url")!),
    credential: new DefaultAzureCredential())
    .AddUserSecrets(typeof(Program).Assembly);
Connecting local environment (your PC)
There is a chance you are already connected.
Let’s first figure out how it works.
Connecting Key Vault as a configuration source, we passed DefaultAzureCredential,
which will try to resolve Key Vault credentials from different sources in given order
and will use the first one it finds.
DefaultAzureCredential access token resolution order
- EnvironmentCredential
- WorkloadIdentityCredential
- ManagedIdentityCredential
- SharedTokenCacheCredential
- VisualStudioCredential
- AzureCliCredential
- AzurePowerShellCredential
- AzureDeveloperCliCredential
- InteractiveBrowserCredential
Important — it will pick first found credential, if the credential is invalid (like expired) or targets different account or subscription, it will fail to connect.
As mentioned before, you might be logged in already, you can try to run the app and see if it works. If not in the next chapter, we’ll see how to connect using Azure CLI and even further how to troubleshoot the connection.
Connect with Az CLI
If you happened not to have it, you can install it on Windows, Linux and even macOS. Anyways it’s a must have tool workigng with Azure.
After install run az login to login.
You can verify that you are logged in using Az CLI using az account show command.
The az account show will display (as json) currently selected subscription (check the name field).
If you see incorrect subscription selected, you can use az account list to list all subscriptions available on your account.
To select the correct run az account set -s "SubscriptionId or Name"
Once you are done, you should be able to run the app.
Troubleshooting connection
As DefaultAzureCredential uses different sources occasionally it might become a pain in the ass.
For example, you just logged in using Azure CLI, yet a while ago you logged inVisual Studio with another account,
or just haven’t used Visual Studio for a while and access token expired.
As Visual Studio has higher priority the invalid token will be used.
You can trace the token resolution process, by adding a code line, like on the example below.
using System.Diagnostics.Tracing;
using Azure.Core.Diagnostics;
using Azure.Identity;

using var listener = AzureEventSourceListener.CreateConsoleLogger(EventLevel.Verbose);

var builder = WebApplication.CreateBuilder(args);

builder.Configuration.AddAzureKeyVault(
    vaultUri: new Uri(builder.Configuration.GetValue<string>("KeyVault:Url")!),
    credential: new DefaultAzureCredential());
Don’t panic when you see errors in a resolution process, read full trace, it’s a try and move on a process.
For example ManagedIdentityCredential will try to connect to a local (available only on cloud environment) endpoint to receive credentials,
that will fail locally for obvious reasons, and resolution will move on.
Custom chain
Having a problem with default credential resolution chain, or for optimization purposes, you can define your own.
Given credential must implement TokenCredential. package Azure.Identity comes with many different implementations.
One of them is ChainedTokenCredential that requires array of TokenCredential which will be tried in a given order.
In a way it is similar to AzureDefaultCredential except it allows you to define what kind of credentials to try and in which order.
The following example defines a custom chain using only token sources used in this example.
var builder = WebApplication.CreateBuilder(args);
builder.Configuration.AddAzureKeyVault(
vaultUri: new Uri(builder.Configuration.GetValue<string>("KeyVault:Url")!),
credential: new ChainedTokenCredential(
new EnvironmentCredential(), // for app running anywhere
new AzureCliCredential(), // for local development environment
new WorkloadIdentityCredential(), // for web / container app and AKS
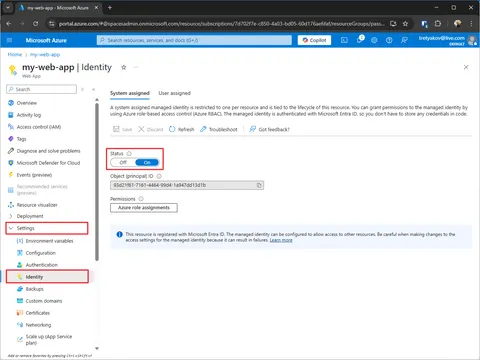
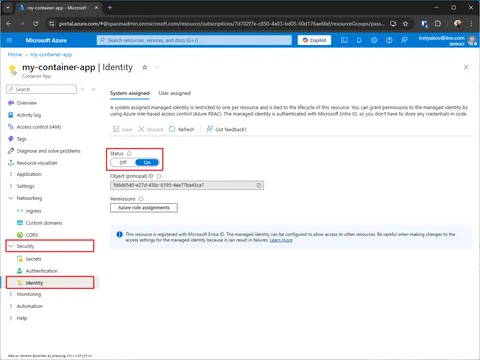
));Web App (App Service) / Container Instance
The steps to connect Web App (App Service) or Container Instance are the same, therefore, I’ll cover both at once.
First, we need to enable System Assigned Identity, below are examples of Web App (App Service) and Container Instance.
Enable System Assigned Identity
The System Assigned Identity — is an Azure feature that will register an identity in Entra ID for a given service (e.g., WebApp or ContainerApp)
as well as will delete it after service is deleted.
The provisioned identity credentials will be served via internal http endpoint consumed by WorkloadIdentityCredential
which is a part of AzureDefaultCredential chain.
As a result, your application will connect to Key Vault using system assigned identity.
Using Az CLI
# for Web App (App Service)
az webapp identity assign --name my-web-app --resource-group passwordless-example

# for Container App
az containerapp identity assign --name my-container-app --resource-group passwordless-example
Using Azure Portal
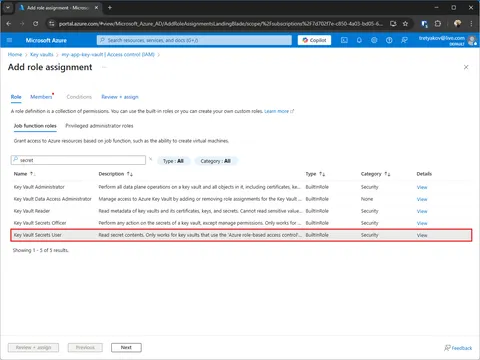
Assign Key Vault Secrets User role to System Assigned Identity
By default, system assigned identity doesn’t have any permissions. To allow it to read secrets from Key Vault, we need to assign it to Key Vault Secrets User role.
Using Az CLI
RESOURCE_GROUP="passwordless-example"
WEBAPP_NAME="my-web-app"
KEYVAULT_NAME="my-app-key-vault"
ROLE_NAME="Key Vault Secrets User"

PRINCIPAL_ID=$(az webapp show \  # use "az container app show" for container apps
  --name $WEBAPP_NAME \
  --resource-group $RESOURCE_GROUP \
  --query identity.principalId \
  --output tsv)

KEYVAULT_ID=$(az keyvault show \
  --name $KEYVAULT_NAME \
  --query id \
  --output tsv)

az role assignment create \
  --assignee $PRINCIPAL_ID \
  --role "$ROLE_NAME" \
  --scope $KEYVAULT_ID
Using Azure Portal
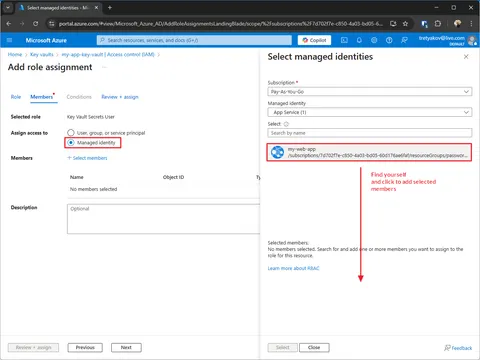
That’s it — deployed as WebApp or Container App the app should work.
Azure Kubernetes Service (AKS)
Running in AKS pod the app will retrieve credential using WorkloadIdentityCredential
which also is a part of DefaultAzureCredential chain,
however by default it will be getting credentials for identity provisioned for node pool.
Technically, you could give node pool identity access to your Key Vault,
but this is a very bad practice.
That would give any software running on that node pool, including 3rd party tools, access to Key Vault.
Important: Do not give node pool identity access to your Key Vault
Instead, we’ll create our own Managed Identity and will configure kubernetes to provision credentials for this identity to our app pods.
One more thing.
In this example I’ll create Identity called my-app-identity and my-app-service-account
implying that both are “app specific”,
however you can use the same identity and/or service account for various apps.
For example an Identity per Environment.
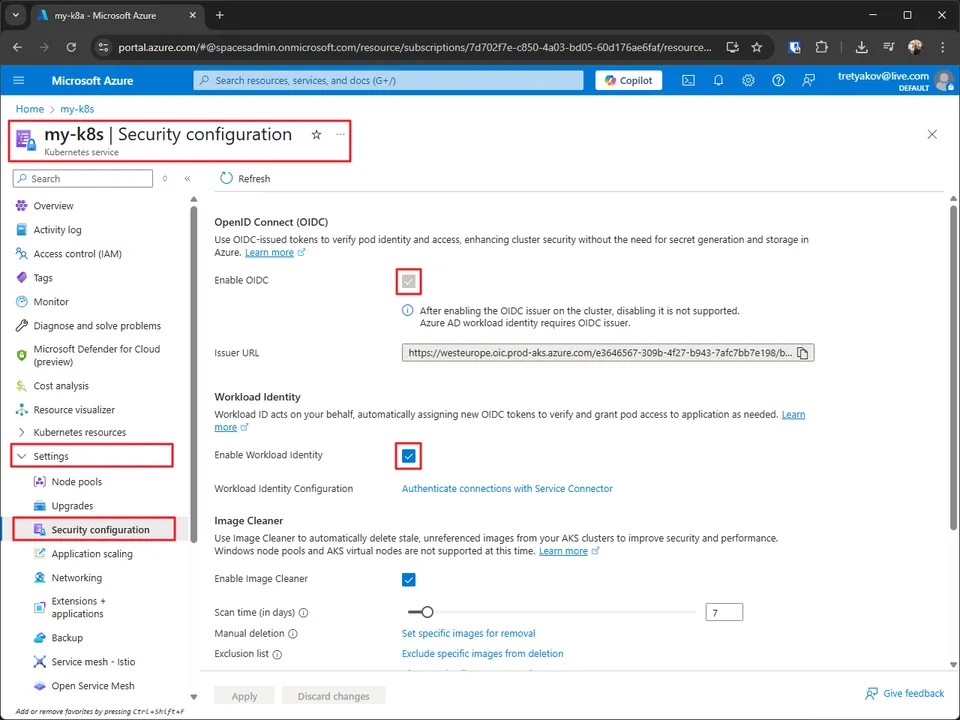
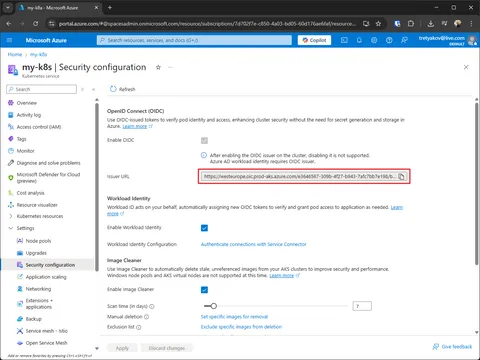
Enable Workload Identity feature on AKS
In order to use Workload Identity in AKS, it must be enabled first as well as OidcIssuer, as Workload Identity relies on it.
Using Az CLI
Use the query below to check for current status.
az aks show --name my-k8s \
  --resource-group my-k8s \
  --query "{oidcIssuerProfile:oidcIssuerProfile, securityProfileWorkloadIdentity:securityProfile.workloadIdentity}"
Use the following commands to enable features that are not enabled.
# to Enable OidcIssuer
az aks update --name my-k8s --resource-group my-k8s --enable-oidc-issuer

# to Enable Workload Identity
az aks update --name my-k8s --resource-group my-k8s --enable-workload-identity
Using Azure Portal
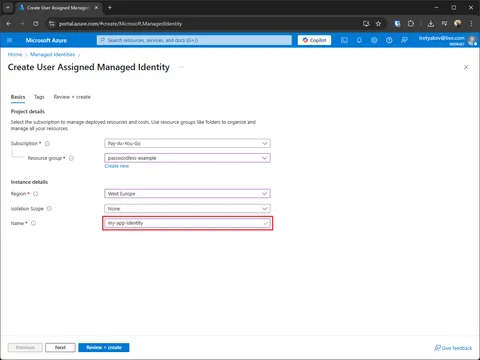
Create Managed Identity
This will be the identity used by the app. In Key Vault we’ll assign Key Vault Secrets user role to it, to grand permission to read secrets.
FIY: The resource group for managed identity doesn’t have to match the cluster.
Using Az CLI
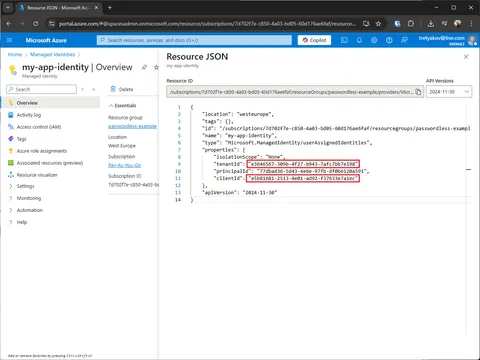
az identity create --resource-group passwordless-example --name my-app-identityIn successful response will be a json object, from where we’ll need a clientId and tenantId.
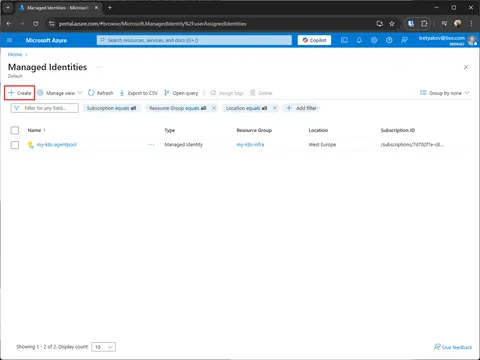
Don’t worry if you lost it, you can always see registered identities using
# the resource group is optional parameter for filtering purposes
az identity list -o table --resource-group passwordless-example
Using Azure Portal
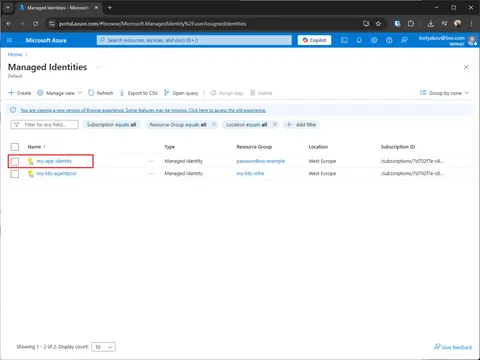
Go to Managed Identities and create new one.

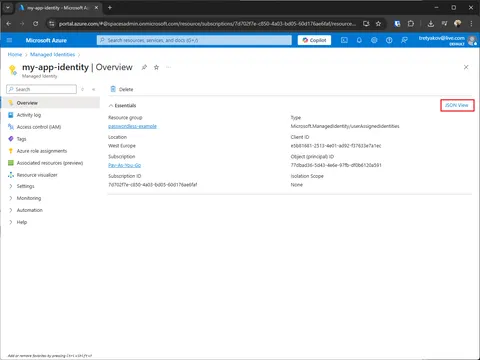
Open created Managed Identity and capture clientId and tenantId.
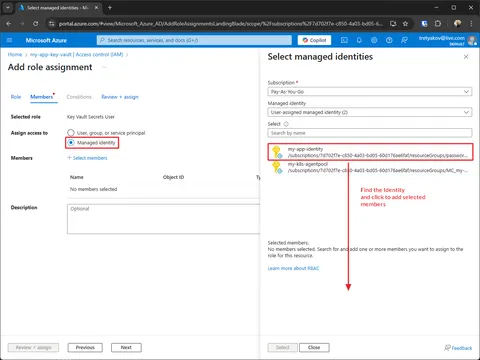
Assign Key Vault Secrets User role to the Identity
Using Az CLI
IDENTITY_CLIENT_ID=$(az identity show \
  --name "my-app-identity" \
  --resource-group "passwordless-example" \
  --query "clientId" \
  --output tsv)

KEY_VAULT_ID=$(az keyvault show \
  --name "my-app-key-vault" \
  --resource-group "passwordless-example" \
  --query "id" \
  --output tsv)

az role assignment create \
  --assignee "$IDENTITY_CLIENT_ID" \
  --role "Key Vault Secrets User" \
  --scope "$KEY_VAULT_ID"
Using Azure Portal
Create Service Account
Create a service account in the same namespace where the app pod will be placed. For the sake of simplicity, I’ll use default namespace.
The labels and annotations in given example are required.
azure.workload.identity/use must be true.
Provide the clientId and tenantId of the identity created in previous exercise.
apiVersion: v1
kind: ServiceAccount
metadata:
name: my-app-service-account
namespace: default
labels:
azure.workload.identity/use: "true"
annotations:
azure.workload.identity/client-id: e5b81681-2513-4e01-ad92-f37633e7a1ec
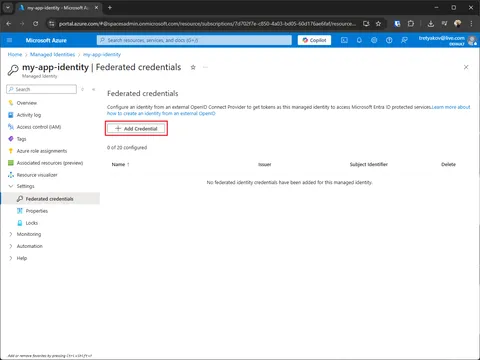
azure.workload.identity/tenant-id: e3646567-309b-4f27-b943-7afc7bb7e198Create Federated Credential
This will be the bridge between Managed Identity and Kubernetes Service Account. The name of federated credential is irrelevant, however, I prefer it to reflect exactly is it bound to.
Using Az CLI
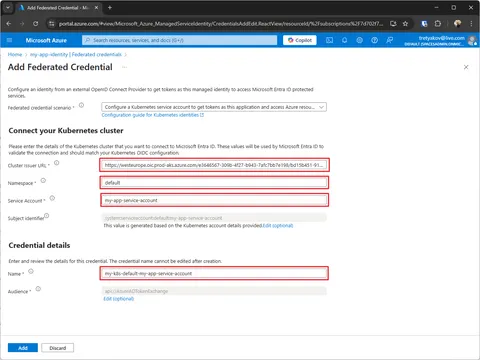
Subject system:serviceaccount:NAMESPACE:SERVICE_ACCOUNT_NAME
# get cluster OIDC Issuer Url
AKS_OIDC_ISSUER_URL=$(az aks show \
  --name my-k8s \
  --resource-group my-k8s \
  --query "oidcIssuerProfile.issuerUrl" -o tsv)

# create federated credential
az identity federated-credential create \
  --name "my-k8s-default-my-app-service-account" \
  --identity-name "my-app-identity" \
  --resource-group "passwordless-example" \
  --issuer $AKS_OIDC_ISSUER_URL \
  --subject "system:serviceaccount:default:my-app-service-account"
Using Azure Portal
Deploy the Pod
Now you can deploy the pod labeling it with azure.workload.identity/use: "true" and
specifying the service account we’ve created.
Assuming you have built a docker image and pushed it into cluster connected registry.
apiVersion: apps/v1
kind: Deployment
metadata:
  name: my-app-deployment
spec:
  replicas: 1
  selector:
    matchLabels:
      app: my-app-pod
  template:
    metadata:
      labels:
        app: my-app-pod
        azure.workload.identity/use: "true"
    spec:
      serviceAccountName: my-app-service-account
      containers:
        - name: my-app-pod
          image: mypasswordlessregistry.azurecr.io/my-app:latest
          ports:
            - containerPort: 8080
Any other way hosted using Environment Variables
The difference with this approach is that we’ll create an identity used by the service manually,
and will pass credential via Environment Variables which will be consumed by EnvironmentCredential which is a part of AzureDefaultCredential.
As a result, your application will connect to Key Vault using that identity.
Environment Variables required
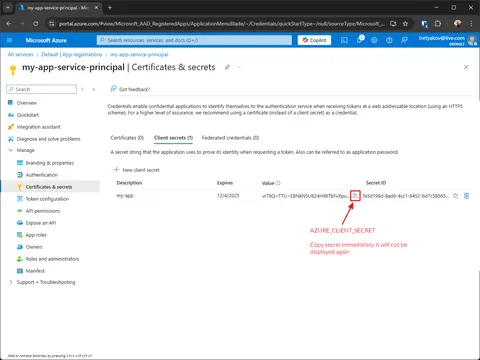
- AZURE_CLIENT_ID
- AZURE_TENANT_ID
- AZURE_CLIENT_SECRET
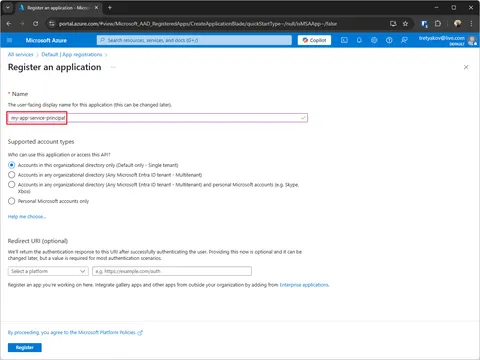
Create Service Account (aka App Registration)
Using Az CLI
APP_ID=$(az ad app create \
  --display-name "my-app-service-principal" \
  --query appId -o tsv)

TENANT_ID=$(az account show --query tenantId --output tsv)

az ad sp create --id $APP_ID

CLIENT_SECRET=$(az ad app credential reset \
  --id $APP_ID \
  --display-name "my-app" \
  --append \
  --query password \
  -o tsv)

echo AZURE_CLIENT_ID: $APP_ID
echo AZURE_TENANT_ID: $TENANT_ID
echo AZURE_CLIENT_SECRET: $CLIENT_SECRET
Using Azure Portal
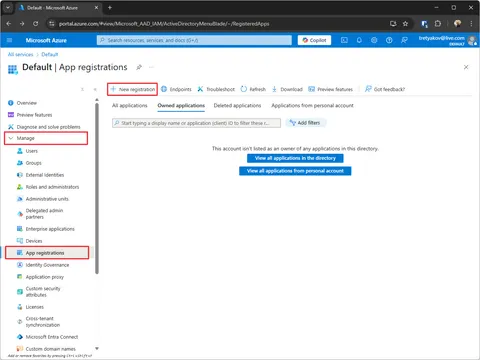
Create app registration (a service account will be created automatically)
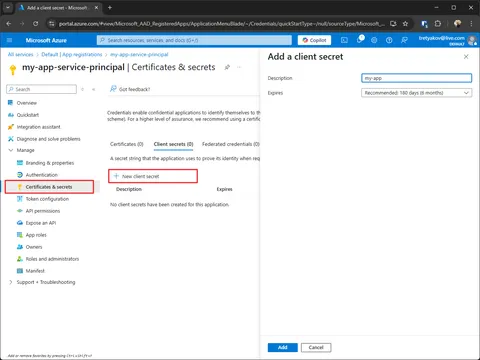
Create and capture secret

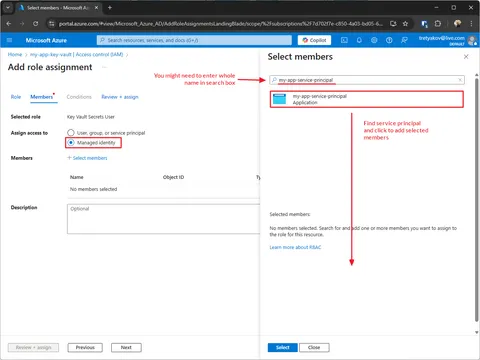
Give Service Principal permissions to read secrets from Key Vault
Using Az CLI
SERVICE_PRINCIPAL_ID=$(az ad sp show --id $APP_ID --query id -o tsv)

KEY_VAULT_ID=$(az keyvault show --name "my-app-key-vault" --query id -o tsv)

az role assignment create \
  --assignee-object-id $SERVICE_PRINCIPAL_ID \
  --assignee-principal-type ServicePrincipal \
  --role "$ROLE_NAME" \
  --scope $KEY_VAULT_ID
Using Azure Portal
Testing Environment Credential locally
For testing purposes, you can specify all three Environment Variables in Properties/launchSettings.json
or for even run your app in docker passing Environment Variables as parameters.
Second approach would be even better,
because you’d know for sure that running from image locally it can’t access Key Vault in any other way but using EnvironmentCredential.
Local docker run example
# assuming you have build your app with tag my-app
docker run -e AZURE_CLIENT_ID=93e498b9-0d3c-4613-b0f4-059ebdd1b976 \
  -e AZURE_TENANT_ID=e3646567-309b-4f27-b943-7afc7bb7e198 \
  -e AZURE_CLIENT_SECRET=vr78Q~TTU~EBNkN5UB24H98TbFvXpuoHnU3Htc~g \
  my-app